Qtopia installation tips and tricks
Jan 16, 2007 — by LinuxDevices Staff — from the LinuxDevices Archive — 35 viewsForeword: This article unravels the mysteries of Trolltech's Qtopia development framework, for new users just trying to get it installed. The article includes examples based on GPL-licensed versions of Qtopia and KDevelop. It was written by three software developers at Mindfire Solutions, a New Delhi, India-based software development services house.
Note that this article is based on the latest version 1.7 release of Trolltech's GPL-licensed Qtopia PDA Edition SDK. Trolltech also offers more recent GPL-licensed Qtopia 4.0 and 4.2 stacks for phones and other mobile devices; information about installing them and using them with KDevelop can be found here.
Enjoy . . . !
by Jain Manish, Batra Prashant, and Garg Rishi
Overview
“How do I start with Qtopia?” — a question that is asked by many developers starting with mobile Linux development, and most of the time it remains unanswered fully. At least that's what we faced when we started development for Qtopia based applications.
In this document, we have tried to compile our initial experience with Qtopia and aim to help our developer community get a quick start with the Qtopia platform for Linux Mobile based devices. This article deals with installation issues, setting up the development environment, creating, compiling, executing and even debugging your Qtopia project with KDevelop.
Developers who are planning to start with Qtopia development can make use of this document and get a quick entry into the actual world of Mobile Linux development instead of struggling with the installation and setup issues.
Introduction
The Qtopia platform is developed by Trolltech to enable the development on Linux based PDAs, mobile devices, etc.
Qtopia is written in C++ and built using Trolltech's cross-platform Qt Embedded toolkit. It supports various processors, including StrongArm, Xscale, MIPS, etc. There are various development environments (IDEs) for Qtopia development, the most popular being Kdevelop, as it comes bundled with the Linux installation CD.
Many Linux-based commercial devices in the market support Qtopia environment. It is also being used as the software platform for the Greenphone, an open phone initiative.
Developing for Qtopia is no doubt easy but only if you have the required tools and have a quick guide “how to” for it. As we found, this information is not available as easily as it sounds. We faced a few problems ourselves and decided to put it all in a document that can help other developers to focus on development rather than struggling to install.
Special thanks to Lorn Potter for his article, Getting Started with Qtopia, which helped us in setting up the environment. We have added a few portions from his article into our own just to maintain continuity and to avoid shifting the reader back and forth.
Tools required
- Operating system: Qtopia is Linux-only currently, so you need a Linux OS for development
- IDE: KDevelop is a popular Integrated Development Environment as it comes with Linux installation and has a simple Qtopia application template. There are other IDEs, but we are referring to KDevelop in this document.
- SDK: Qtopia SDK is what we used. You have a choice of downloading the source code or using a pre-compiled SDK. The commercial SDK can be purchased from Trolltech, while the free, GPL version can be downloaded here. These install to /opt/Qtopia on Linux machines.
The FTP site contains various SDKs corresponding to the OS you are using (Red Hat or SUSE, etc.). We refer to the free GPL version in this document.
Installation
Download the qtopia sdk (qtopia-free-1.7.0-2rh9.i386.rpm) and keep it in any folder. We use the root folder for our installation purpose.
On the command line, type:
rpm -i qtopia-free-1.7.0-2rh9.i386.rpm
to install the sdk from the location where you kept your file.
KDevelop is IDE and QtDesigner is used for designing applications. Both KDevelop and QtDesigner come with your Linux CD.
Now, the real fun starts…
Red Hat 9 comes with Kdevelop2 and Qt3 designer. But for Qtopia development you need Kdevelop3. You can switch to Red Hat Enterprise Edition to get Kdevelop3, but, with that you get Qt3 designer, which at present cannot be used for designing without disturbing the format used by Kdevelop.
Note: QtDesigner 3 cannot be used for editing the .ui “user interface” files, so you need to be sure to use Designer from Qt 2 for that
A common problem that most of us will face is how to get both QtDesigner3 and QtDesigner2 on the same machine?
There are lot of dependency problems when you try to do it. If you are lucky and resolve them quickly, very good. Otherwise, here is a solution for you.
You need two machines. Install Red Hat9 on one system and Red Hat Enterprise Edition on another. Install Qt2 on the computer with Red Hat9. Of course, it will ask for dependencies, but they are much less complicated compared to the dependencies that you get while installing on Red Hat Enterprise Edition.
After installing the Qt2 on first machine, just copy and paste the whole Qt2 folder from that machine to the path /usr/bin/ on another machine with Red Hat Enterprise Edition along with Qt3. This way you will have both designer versions on the same system.
Sounds pretty easy? Try doing it without the above knowledge and you may find your system doing abnormal things, like it crashes and you may have to reinstall Linux, etc.
Now you have all the tools and machinery to start the actual development.
Creating your first KDevelop project
- Start KDevelop3 IDE
- From the Project menu choose New Project.
- Open the C++ directory icon, under the directory Embedded.
- Click the file called Qtopia Application to start a new Qtopia project.
- It will ask for name that you want to give to the project; you can give any name, let's call it Mindfire.
Once you have created a new project you can start modifications as per your need.
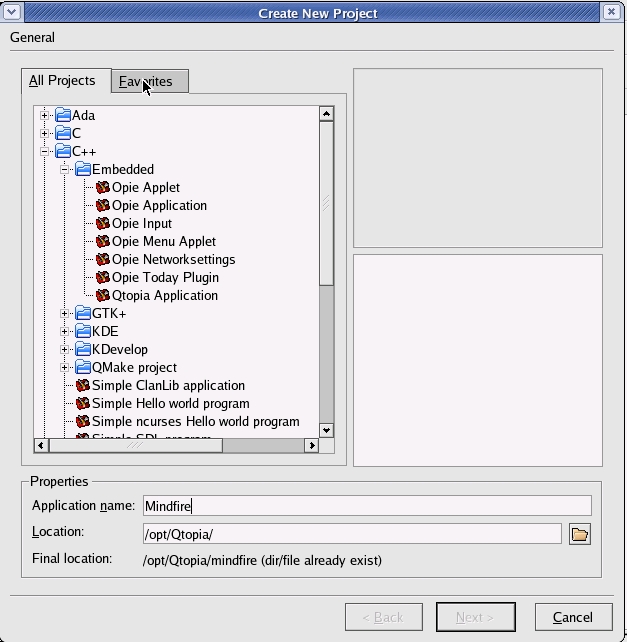
Figure 1: Creating new project
(Click to enlarge)
Note: Do not open the .ui resource files by double clicking, because QtDesigner-3 is associated with it (which currently is not supported with KDevelop3's format) and disturbs the file. You should open .ui file from QtDesigner-2 for editing.
Setting up the development environment
We need to set some environmental variables for KDevelop project to work correctly. Run KDevelop, and then click on Project–>Project Options–>Run Options. Add the following variables:
Name: QTDIR Value: /opt/Qtopia
Name: QPEDIR Value: /opt/Qtopia
Name: PATH Value: /opt/Qtopia/bin:$PATH
Name: LD_LIBRARY_PATH Value: /opt/Qtopia/lib:$LD_LIBRARY_PATH
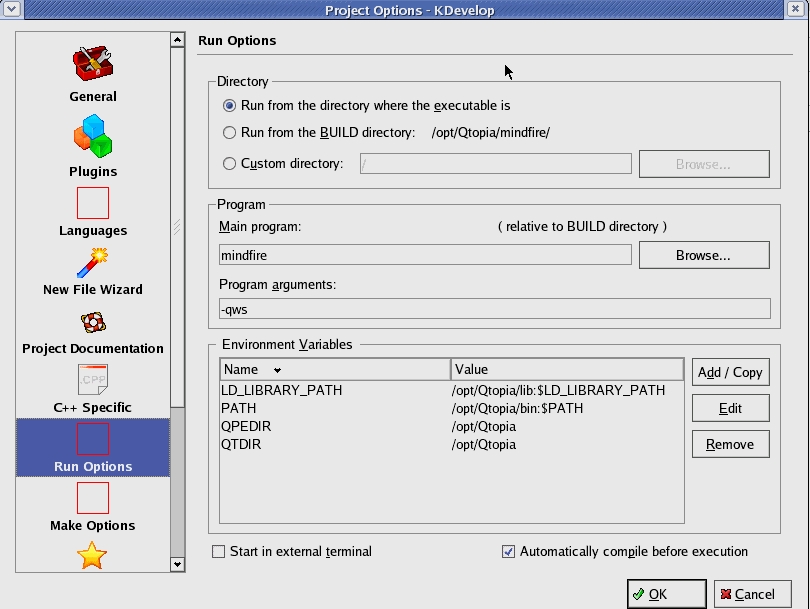
Figure 2: Setting project environment variables
(Click to enlarge)
Similarly, add variables to the Make Options, for desktop development:
Name: QTDIR Value: /opt/Qtopia
Name: QPEDIR Value: /opt/Qtopia
Name: PATH Value: /opt/Qtopia/bin:/opt/Qtopia/tmake/bin:$PATH
Name: LD_LIBRARY_PATH Value: /opt/Qtopia/lib:$LD_LIBRARY_PATH
Name: TMAKEPATH Value:/opt/Qtopia/tmake/lib/qws/linux-generic-g++

Figure 3: Setting make environment variables
(Click to enlarge)
Project build
In order to compile and build your project, you need to generate a makefile manually, as KDevelop does not use tmake as it should by default. First you need to to set following environment variable using command line to run tmake & qvfb (discussed later).
# export PATH=/opt/Qtopia/bin:$PATH
To generate makefile:
# export TMAKEPATH=/opt/Qtopia/tmake/lib/qws/linux-generic-g++
# tmake -o Makefile Mindfire.pro
Note: Make sure that you are in current project directory at command line while running tmake command.
You can now easily build the project using F8 from within KDevelop. This glitch should be resolved in newer versions of Qtopia that use qmake to generate makefiles.
Executing: tasting the first blood
The developed application can be tested on the Linux machine using Virtual FrameBuffer.
QT Virtual Frame buffer (QVFb) is provided as part of a standard distribution package and acts like an emulator for Qtopia applications, hence allowing Qt/Embedded programs to be developed and tested on a desktop machine.
QVFb runs as a normal application on a desktop machine and provides a virtual frame buffer to Qt/Embedded applications. Linux devices write to the screen using a frame buffer and QVFb emulates this behavior.
Steps to run the buffer:
- Export the following environment variables:
   # export PATH=/opt/Qtopia/bin:$PATH
   # export LD_LIBRARY_PATH=/opt/Qtopia/lib:$LD_LIBRARY_PATH
Note: You may not need to export the second variable if you have set it in IDE. But, if you are doing it from Command line than you have to export it.
- To launch the virtual frame buffer we need to run the following command on the console:
# qvfb &
After this step you need to go back to KDevelop and do Build–>Execute Main Program (Shift + F9) to execute the application.
Likely problems faced while running the application
- You may get the following error after running the above command:
# bash: qvfb: command not foundThis means that the variables have not been properly set or exported in environment. To solve this problem we need to set the path of qvfb, which is /opt/Qtopia/bin/qvfb:
# export PATH=/opt/Qtopia/bin:$PATH - While running the application if the following error comes:
“Error while loading shared libraries :libqpe.so.1: cannot shared object file: No Such file or directory”
This means there is some problem with setting the path of qtopia library. The solution is to add one environment variable into Run Options:
LD_LIBRARY_PATH path /opt/Qtopia/libIn case it does not solve your problem, you can reset all the environmental variables existing in Run and Make Options and then again build the project
Debugging your application
One of the most important parts of any development, from the developer's point of view, is debugging the application. This was a real back burner for us as we could not find any relevant information on internet or in documents. But finally, with persistence, we hit upon methods worked, and we unraveled the mystery.
Set path for 'Debugging shell' and 'Directory where gdb resides.'
For doing this click on Project–>Project Options–>Debugger and set the path for both inside Kdevelop. In our case we set them /usr/bin/libtool and /usr/bin/ respectively.
Note: Be sure to add even the slashes as otherwise it won't run.

Figure 4: Setting debugging options
(Click to enlarge)
Then you need to change a parameter (Config) from qtopia warn_on debug to qtopia warn_on release in Mindfire.pro (your project file).
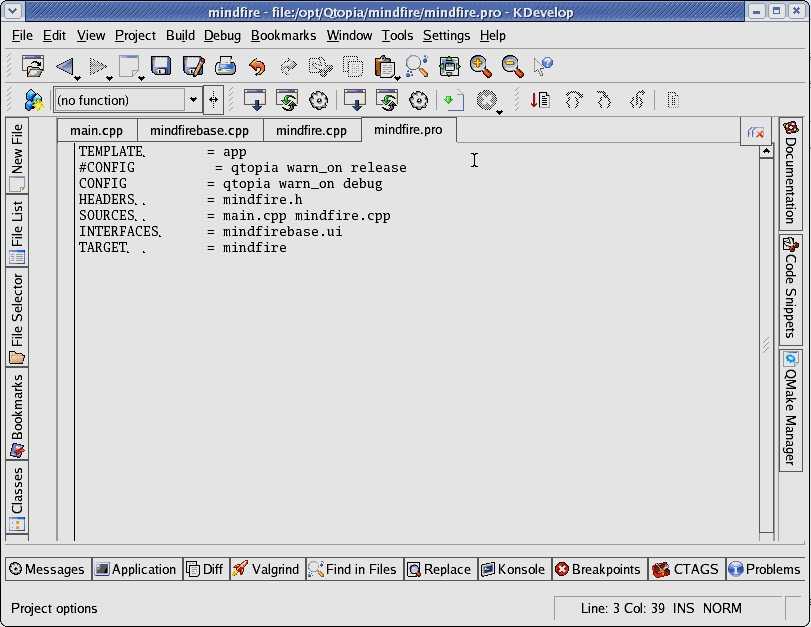
Figure 5: Project file changes
(Click to enlarge)
This should do the trick, and you should now ready to debug your first Qtopia application. In some strange situations, if you still cannot debug, then try running a Build Clean and then run Build again, followed by debugging.
We hope you found your answers to Qtopia mysteries in this document. If you have any questions, please contact us and we would be glad to extend our support where we can.
About the authors:
 Manish started his career with Mindfire Solutions in 2005. His expertise includes but is not limited to C, C++, Palm, and Linux Mobile. He boasts of crystal clear C/C++ concepts and likes to get involved in heated debates on the fundamentals of programming. He likes to play cricket and read magazines in his free time.
 Prashant has been with Mindfire Solutions since 2005, and has proven his value and strength by moving between technologies with ease. He is a good team player and believes in sharing his knowledge with everyone. His expertise includes C, C++, Java, J2EE, J2ME, mySQL, Linux Mobile, and Palm OS. When free, Prashant involves himself in activities such as net surfing and watching informative television programs.
 Rishi has been with Mindfire Solutions since beginning of 2006. He is sincere towards his responsibilities and is a quick learner. His expertise includes C, C++, Linux Mobile, Mac OS, xCode, wxWidgets. In free time, Rishi relishes movies and loves to watch cricket matches.
This article was originally published on LinuxDevices.com and has been donated to the open source community by QuinStreet Inc. Please visit LinuxToday.com for up-to-date news and articles about Linux and open source.