Migrating to Linux kernel 2.6 — Part 4: Migrating custom Linux installations to 2.6
Mar 5, 2004 — by LinuxDevices Staff — from the LinuxDevices Archive — 2 viewsForeword — This whitepaper provides an overview of the types of changes that you may need to make to a customized or specialized Linux installation in order to use it with the Linux 2.6 kernel, building upon the configuration file and administrative updates that were touched upon in the third article in this series.
This whitepaper continues the series from TimeSys's “2.6 Linux Resource Center” on using the new Linux 2.6 kernel. Authored by TimeSys Senior Product Manager William von Hagen, the series places special emphasis on the primary issues in migrating existing drivers, applications, and embedded Linux deployments to a Linux distribution based on the 2.6 kernel.
Material presented is largely vendor-neutral.
Enjoy! . . .
Linux is commonly used for a wide range of technical and commercial reasons today. Linux runs on a tremendous range of supported architectures, processors, buses, and devices, and combines the power of inherent multi-tasking with the attractive notion of an open, royalty-free operating system. At the high and medium ends, Linux systems support enterprise infrastructure such as file, mail, and web servers, and business-unit infrastructure such as firewalls, VPN servers, routers, and gateways. In its smallest incarnations, Linux is commonly used in embedded systems such as process control systems, PDAs, home gateways, and set-top boxes.
Linux systems used for enterprise and business-unit infrastructure are often very similar to desktop Linux systems from a startup and system administration point of view. They typically also use the same startup mechanism to determine the processes that should be started at boot time, as described in the next section. The previous whitepaper in this series, “Using the 2.6 Kernel with Your Current System”, provided an overview of the types of changes you might need to make to the command files (scripts) that are executed when booting 2.6-based systems of these types.
Embedded systems must typically boot quickly, start a limited number of processes, and operate under resource constraints not found on larger Linux systems. The hardware used for storage in embedded systems, such as flash, compact flash, and Disk-on-Chip hardware, limits the amount of available storage for the system, your applications, and your data. These types of storage introduce specialized types of filesystem and hardware issues, such as wear-leveling, that are not relevant to larger systems. For example, wear-leveling is only implemented in filesystems targeted for devices that can only be written to a certain number of times, because its goal is to guarantee that all of the target storage is written to an approximately equal number of times.
Embedded System Components and Terminology
All Linux distributions consist of the same core building blocks: a kernel and a root filesystem. The latter contains software and libraries used by the system itself, any infrastructure required to support users on the system, and the applications that users execute to do their work. In standard development systems, many of the applications in the root filesystem are the compilers and related software used for application development (known as toolchains).
Linux distributions targeted for embedded use typically include these same core building blocks, but with some twists. For example, because embedded development is typically done on a desktop system but is targeted for a specific embedded development board, embedded Linux distributions such as TimeSys Linux provide a kernel for the embedded board, a root filesystem for the embedded board, and multiple toolchains. One set of toolchains is included in the filesystem for the embedded board itself, while another is installed in your desktop system's filesystem. The latter is known as a cross-compiler, and produces binaries on your desktop system that will execute on your embedded board. TimeSys Linux also includes a third toolchain that you can execute on a Windows system to produce binaries that will run on your embedded board.
“Host” and “target” systems are a key concept for most embedded development. Cross-compilers are typically used for embedded development because embedded boards often do not have the resources required to compile and optimize the applications that will run on them. Similarly, they may not have the storage required for a full development and debugging environment. A common solution for storage limitations is for the embedded board to use a mechanism such as NFS (the Network File System) to access a filesystem that is actually stored on your desktop development system. Because a desktop development system provides both the cross-compiler and the storage used by the embedded board during development, it is usually referred to as the “host” machine. Because the embedded development board is where applications will eventually be stored and execute, the embedded development board is usually referred to as the “target” machine.
As a final wrinkle, host systems are used to build the filesystem that will eventually be deployed on an embedded system. For most embedded systems, these are typically compressed, in-memory filesystems known as initial RAM disks, or other compressed filesystem images that are stored in flash or compact flash and are either loaded into memory or used directly.
The multiple toolchains and filesystem components associated with embedded Linux distributions increases the complexity of migrating an embedded Linux system to the 2.6 kernel. For example, in order to compile the 2.6 kernel for your embedded board, you might have to first update any cross-compiler that you are using. However, before you can do that, you might first have to update the compiler that you are using on your desktop system to build the cross-compiler that you will be using. The next section highlights the key components of an embedded system that you must consider upgrading when moving to the 2.6 kernel, and the sequence in which you should upgrade them, if necessary.
Updating an Embedded System
If you install an off-the-shelf, 2.6-based distribution such as a TimeSys Linux 2.6 reference distribution, it provides a set of core Linux components that have already been certified to work together. However, even in this case, any changes that you have made to your existing installation or deployment can not be migrated to the new SDK automatically. Possible migration issues when moving to a 2.6-based distribution from any existing Linux deployment are the following:
- Perform any mandatory package updates to the compilers and build environment on any desktop system that you use in conjunction with your embedded system. (Explained in the third whitepaper in this series, “Using the 2.6 Kernel with Your Current System“.)
- Perform any mandatory package updates to any cross-compilers that you are using to build applications for the target system. (Described in third whitepaper in this series, “Using the 2.6 Kernel with Your Current System“.)
- Migrate any customized kernel configuration to the 2.6 kernel provided with your 2.6-based distribution. (See the first whitepaper in this series, “Customizing a 2.6-Based Kernel“.)
- Convert any device drivers that you have written to the new device driver model used by the 2.6 kernel (Explained in the second whitepaper in this series, “Migrating Device Drivers to 2.6“.)
- Perform any mandatory package updates to the applications and utilities used in your existing root filesystem or initial RAM disk.
- Migrate any administrative or configuration changes that you have made from your existing root filesystem to the new root filesystem provided with your 2.6-based Linux distribution
- Convert your custom applications from your existing root filesystem to the new root filesystem that you will use with your 2.6-based distribution.
The next few sections focus on points 5 and 6. The final whitepaper in this series, “Migrating Applications to the 2.6 Kernel and NPTL” (Native POSIX Threading Library), provides an overview of the most common issues that you might encounter in step 7, as you migrate your existing applications. All of the white papers in this series can be found in the TimeSys online Linux resource center.
Initial RAM Disks and Root Filesystems
A filesystem is a section of some storage medium from which your system can read (and usually write) data. Linux uses filesystems for a variety of purposes, ranging from storing system and user files and directories to serving as swap space that can be used to support virtual memory. The primary filesystem on any Linux system is known as the root filesystem, and is always made available to users (“mounted”) through the / directory.
The first step in the Linux boot process is to load the kernel into memory. When many Linux systems boot, the kernel uses an in-memory filesystem, known as an initial RAM disk, that is uncompressed, loaded into memory, and used as a temporary root filesystem during the boot process. Using an initial RAM disk enables you to execute commands and pre-load modules that you might need during the remainder of the boot process or before your system's hardware is available to users. On desktop systems, the initial RAM disk is almost always a transient part of the boot process. On embedded Linux systems with sufficient memory, the initial RAM disk might be the actual root filesystem used when Linux is running.
Tools such as TimeSys' Target Configurator, a component of the TimeStorm Linux Development Suite, make it easy to create an initial RAM disk that contains the system software that you need at boot time or run time. The Target Configurator also simplifies adding your applications to an initial RAM disk if that is going to serve as your root filesystem, or to filesystems such as JFFS2 or EXT3 used on different types of storage devices. The remainder of this section focuses on migrating initial RAM disks to systems using the 2.6 kernel.
The TimeSys Linux 2.6 Reference Distributions include pre-assembled initial RAM disks for all supported platforms and architectures. Most Linux distributions provide scripts (such as the mkinitrd script used with Red Hat Linux) that enable you to build your own initial RAM disk. However, if you are migrating to a 2.6-based kernel and want to continue using an initial RAM disk that you have already assembled, you should examine the contents of the RAM disk to ensure that it is compatible with your new kernel.
Examining an existing initial RAM disk is done by mounting it as a loopback device on your Linux system. A loopback device is a virtual device that your Linux system can access in the same way as any physical device. In order to mount an initial RAM disk (or to have created an initial RAM disk in the first place), your current kernel must have been compiled with support for loopback devices. For the 2.6 Linux kernel, support for loopback devices is enabled through the Device Drivers > Block Devices > Loopback device support option in the kernel configuration editor. For the 2.4 kernel, this option is located in Block Devices > Loopback device support.
On desktop Linux systems that use the GRUB (Grand Unified Boot Loader) boot loader, the system's initial RAM disk is usually stored as a separate file external to the kernel. This file is typically located in the /boot directory and is identified in the GRUB configuration file (/etc/grub.conf). On most embedded systems, the initial RAM disk is created as a file external to the kernel, but is bundled with the kernel as a final step in the kernel build process. The following figure shows an initial RAM disk being created in TimeSys's Target Configurator, which simplifies building and maintaining root filesystems of various types.
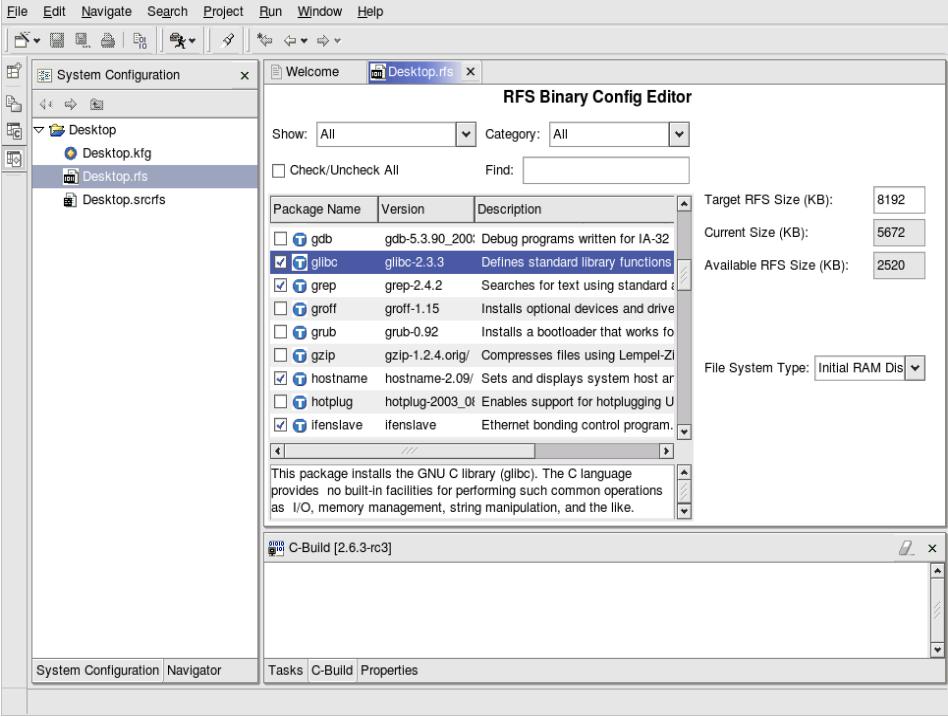
(Click to enlarge)
Desktop Linux systems typically use the EXT2 filesystem in their initial RAM disks, but many embedded Linux systems use smaller, more simple types of filesystems such as CRAMFS, ROMFS, or even the Minix filesystem. Regardless of the type of filesystem contained in an initial RAM disk, an initial RAM disk is typically compressed using gzip to save even more space. The Linux initial RAM disk loader recognizes compressed files and automatically uncompresses them before mounting them.
If you have an existing initial RAM disk that you want to migrate to the 2.6 kernel, you will need to uncompress it, mount it, and examine it. Initial RAM disks are always compressed, even if the filename does not have the traditional “.gz” extension, so you may need to rename the file in order to uncompress it successfully. Typical commands to uncompress and mount an initial RAM disk are the following:
# gunzip initrd.img.gz
# mount -t ext2 -o loop initrd.img /mnt/initrd
To mount any filesystem, the directory that you are using as a mountpoint (/mnt/initrd in this example) must already exist. The mount command's -t option specifies the filesystem type, and is actually optional unless your initial RAM disk is not in EXT2 format. Once an initial RAM disk is mounted, it appears in a disk listing (done using the “df” command) just like any other disk:
Filesystem          1K-blocks  Used Available Use% Mounted on
/tmp/initrd.img     2948       510      2288  19% /mnt/initrd
Once mounted, an initial RAM disk can be explored like any other filesystem, as in the following example:
# cd /mnt/initrd
# ls -al
total 13
drwxr-xr-x     9 root     root         1024 Feb 16 13:31 .
drwxr-xr-x    16 root     root         4096 Mar  3 08:58 ..
drwxr-xr-x     2 root     root         1024 Feb 16 13:31 bin
drwxr-xr-x     2 root     root         1024 Feb 16 13:31 dev
drwxr-xr-x     2 root     root         1024 Feb 16 13:31 etc
drwxr-xr-x     2 root     root         1024 Feb 16 13:31 lib
-rwxr-xr-x     1 root     root          340 Feb 16 13:31 linuxrc
drwxr-xr-x     2 root     root         1024 Feb 16 13:31 loopfs
drwxr-xr-x     2 root     root         1024 Feb 16 13:31 proc
lrwxrwxrwx     1 root     root            3 Feb 16 13:31 sbin -> bin
drwxr-xr-x     2 root     root         1024 Feb 16 13:31 sysroot
The next section of this whitepaper discusses the sequence of events that occur and the commands that are executed when a Linux system boots. When migrating a custom Linux deployment to the 2.6 kernel, it is important to understand which command files specify the commands that are executed when your system boots, to ensure that they are compatible with the 2.6 kernel. The next few sections of this whitepaper discuss the Linux boot sequence and the command files and process that it executes in various scenarios.
The Linux Boot Sequence
After loading the kernel, traditional Unix and Linux systems execute a system application known as the init (initialization) process, which is typically found in /sbin/init on Linux systems. Typically, the init process is process number 1 on the system, as shown in a process status listing produced using the ps command, and is therefore the ancestor of all other processes on your system. The init process reads the file /etc/inittab to identify the way in which the system should boot and lists all other processes and programs that it should start. The init process and the /etc/inittab file are discussed in detail later in this whitepaper.
If your system uses an initial RAM disk, the boot sequence is slightly different, as explained in the next section.
The Linux Boot Sequence for Initial RAM Disks
If your system uses an initial RAM disk, the boot sequence includes one extra step. Instead of initially executing the init process, the system uncompresses and mounts the initial RAM disk, and then executes the file /linuxrc. This file must therefore be executable, but can be a command file that lists other commands to execute, can be a multi-call binary such as BusyBox, or can simply be a symbolic link to a multi-call binary or to the /sbin/init process itself.
Executing the file /linuxrc is done as a step in the initial RAM disk's mount process, as specified in the kernel source file init/do_mounts_initrd.c. A sample /linuxrc file, where the /linuxrc file in your initial RAM disk is actually a command script (taken from a Red Hat 9 system that does not use the devfs filesystem or udev) is the following:
#!/bin/nash
echo Mounting /proc filesystem
mount -t proc /proc /proc
echo Creating block devices
mkdevices /dev
echo Creating root device
mkrootdev /dev/root
echo 0x0100 > /proc/sys/kernel/real-root-dev
echo Mounting root filesystem
mount -o defaults --ro -t ext3 /dev/root /sysroot
pivot_root /sysroot /sysroot/initrd
umount /initrd/proc
As you can see from this example, the default /linuxrc file on a Red Hat system that uses an initial RAM disk executes a number of commands that help initialize the system.
If you are migrating a Linux system that provides local storage and therefore is not limited to the initial RAM disk, the last commands in this command file mount the root filesystem on your storage device and use the pivot_root command to change the system's idea of the / directory. The pivot_root command, included in the linux-utils package, is used to change the system's root directory from the initial RAM disk to the device that actually provides your long-term storage. If you are using GRUB, this device is identified via one of your boot arguments, the root=value parameter.
When upgrading a custom Linux system that uses an inital RAM disk to the 2.6 kernel, you will need to do several things:
mount and examine the initial RAM disk to verify how it uses the /linuxrc file.
if the /linuxrc file is a command script, you will need to check the commands that it executes in order to ensure that they are compliant with your 2.6 kernel. If it specifically references commands such as modprobe or insmod, you will have to make sure that you have installed 2.6-compatible versions of these utilities in your initial RAM disk and any other filesystems that you use. Your initial RAM disk must also contain kernel modules that have been built for the 2.6 kernel, and therefore follow the naming convention required by the 2.6 kernel – using the “.ko” extension rather than the classic “.o” extension.
if the /linuxrc file is a symbolic or hard link to the /sbin/init program, you will need to make sure that the command file used by the init program is not 2.4-specific. If it specifically references commands such as modprobe or insmod, you will have to make sure that you have installed 2.6-compatible versions of these utilities in your initial RAM disk and any other filesystems that you use. Your initial RAM disk must also contain kernel modules that have been built for the 2.6 kernel, and therefore follow the naming convention required by the 2.6 kernel – using the “.ko” extension rather than the classic “.o” extension. The files and execution sequence used by the init process are discussed in the next section of this white paper.
Assuming that your system executes the /linuxrc file correctly, the system typically either changes the root of your filesystem to a new / directory, or manually executes the /sbin/init process. The Linux kernel performs a sequential search for the init process (as specified in the kernel source file init/main.c). Some older kernels required that you specify the name of the file that you executed as part of the boot process, using the initrd=value parameter in the boot loader. This is not necessarily a bad idea, but is extraneous if you are using an initial RAM disk and use the exec command in your /linuxrc file to automatically start the init process.
The next section of this white paper discusses the standard Linux init process and identifies the files and system applications that it automatically executes.
The Standard Linux Init Sequence
On desktop and larger systems, most Linux systems use a package of applications known as the SysVInit package, and a package of related scripts known as the initscripts package, to identify the processes that are started when a system boots and the order in which they are started.
Most desktop and larger Linux systems use the concept of “run levels” to identify the applications that the system executes and the order in which they are executed. Different “run levels” are simply a way of defining a set of applications that the system administrator believes should be run when the system is being used in a certain way. for example, run level 1 is usually known as single-user mode, and is used for system maintenance. Only the core set of applications required for a system administrator to contact the system and perform maintenance tasks are running when the system is in run level 1.
Systems that use both the SysVInit and initscripts packages boot in the following sequence: once the kernel is loaded and begins executing, it invokes a process known as the init (initialization) process, which reads the file /etc/inittab to identify the basic processes and programs that it should start.
In the /etc/inittab file, the default run level is identified with a line containing the string “initdefault”, as in the following example:
id:2:initdefault:
In this case, the default run level is 2. An additional entry in the /etc/inittab file identifies a command script that is run to initialize the system itself, as in the following example:
si::sysinit:/etc/rc.d/rc.sysinit
After the system initialization script is run, Linux distributions that use the SysVInit and initscripts packages then define what occurs when the system enters a specific run level. For example, a few lines later in the /etc/inittab file, you might see additional information about run level 2 in an entry like the following:
l2:2:wait:/etc/init.d/rc 2
This line specifies that when the system enters run level 2, the /etc/init.d/rc command will be executed with an argument of “2”. This causes the “rc” (run command) command to execute all of the appropriate files located in the directory /etc/rc2.d. The files in this directory have names of the form SNNname or KNNname, and are usually executable shell scripts (or are links to a common set of scripts) that contain lists of other system commands to execute. Files beginning with the letter 'S' are executed when the system starts a specified run level. Entries beginning with the letter 'K' are executed when the system leaves a specified run level. Commands are executed in the numerical order specified by the number NN. The “name” portion of an entry is user-defined, but should generally be evocative of the program or subsystem that the file starts.
Checking for Customizations in Your Boot Sequence
The previous sections of this whitepaper discussed the boot mechanisms used on Linux system that use an initial RAM disk and those that booted using local storage that provides a root filesystem.
When migrating to the 2.6 kernel, a capsule summary of the changes that you may need to make (or should verify) are the following:
- you must copy any mandatory loadable kernel modules (LKMs) to any initial RAM disk that you are using. To work with a 2.6 kernel, these must all use the new “.ko” naming convention (and must have been compiled against a 2.6 kernel).
- the /linuxrc file in an initial RAM disk or any of the files in the generic boot sequence (/etc/inittab) should not contain any explicit module load references that include the old module conventions (i.e., the “.o” vs “.ko” naming conventions.
One of the advantages of a kernel-aware tool such as TimeSys' Target Configurator is that it automatically creates an initial RAM disk (if required) and therefore creates a 2.6-compliant root filesystem. If you are manually creating a root filesystem or initial RAM disk, you will need to verify that your root filesystem contains the appropriate initialization commands.
Generic 2.4 to 2.6 Differences
If you are migrating a TimeSys Linux system based on the 2.4 kernel to one based on the 2.6 kernel and have customized your system's boot sequence or the applications that it executes, you will have to make parallel modifications to your system's boot sequence. As discussed previously, if your 2.4 system explicitly loaded kernel modules for specific drivers or subsystems, you will have to make sure that you have installed 2.6-compatible versions of the utilities. Your initial RAM disk and filesystems must also contain kernel modules that have been built for the 2.6 kernel, and therefore follow the naming convention required by the 2.6 kernel – using the “.ko” extension rather than the classic “.o” extension.
If your 2.6 system uses the devfs filesystem rather than the standard Linux filesystem or udev, you may need to upgrade any device or filesystem references to the appropriate filenames for your target filesystem. For example, if you were using the standard dev filesystem for your 2.4 kernel and need to update your system to devfs for 2.6, you would need to change references to devices such as /dev/md0 to the appropriate devfs device names such as /dev/md/0.
Verifying Library Requirements
Another significant change between the 2.4 and 2.6 kernel is that many applications have been updated to link against updated GLIBC or uClibc libraries. If this is the case, you will also have to make sure that your initial RAM disk or, where appropriate, root filesystem contains the right versions of any shared libraries that your application requires. This is generally not an issue if you are building your initial RAM disk or root filesystem as part of the upgrade process, but is definitely an issue if you are adapting an existing initial RAM disk or root filesystem for use with the 2.6 Linux kernel.
Conclusion
The Linux boot process has not changed across the 2.4 and 2.6 kernels, but it is important to understand how your system is initialized when migrating an existing system to the 2.6 kernel. Though the boot process itself has not changed, kernel conventions for modules have changed, so it important to verify that existing boot commands still function correctly. It is also generally important to understand the files and applications that a Linux system executed when it boots in order to determine where you may need to make 2.6-related changes. Using a certified 2.6-based distribution such as one of TimeSys' 2.6 deference distributions is an easy solution to this issue, but migrating any custom Linux implementation is feasible as long as you understand the boot sequence and carefully examine the files executed during your system's boot process.
 About the author: William von Hagen is a Senior Product Manager at TimeSys Corp., has been a Unix devotee for over twenty years, and has been a Linux fanatic since the early 1990s. He has worked as a system administrator, writer, developer, systems programmer, drummer, and product and content manager. Bill is the author of Linux Filesystems, Hacking the TiVo, SGML for Dummies, Installing Red Hat Linux 7, and is the coauthor of The Definitive Guide to GCC (with Kurt Wall) and The Mac OS X Power Users Guide (with Brian Profitt). Linux Filesystems is available in English, Spanish, Polish, and traditional Chinese. Bill has also written for publications including Linux Magazine, Mac Tech, Linux Format, and online sites such as Linux Planet and Linux Today. An avid computer collector specializing in workstations, he owns more than 200 computer systems.
Next!
The next segment of this series of white papers provides an overview of changes that you may need to make to existing applications so that they will work with the 2.6 kernel and the new threading model provided in the Native POSIX Threading Library (NTPL) used by the 2.6 kernel. For additional whitepapers and other related information on upgrading systems to the 2.6 kernel and the NPTL, please visit TimeSys. TimeSys also offers webinars on 2.6-related topics – for more information or to sign up, please visit TimeSys Webinars page.
This article is part four of a series of whitepapers from TimeSys on Migrating to Linux kernel 2.6. The series includes:
- Customizing a 2.6-based Linux kernel
- Migrating device drivers to Linux kernel 2.6
- Using the 2.6 kernel with your current system
- Migrating custom Linux installations to 2.6
- Migrating applications to the 2.6 kernel and NPTL
This article was originally published on LinuxDevices.com and has been donated to the open source community by QuinStreet Inc. Please visit LinuxToday.com for up-to-date news and articles about Linux and open source.