ELJonline: MP3 Player on JUMPtec DIMM-PC/486-I
Nov 1, 2000 — by LinuxDevices Staff — from the LinuxDevices Archive — 22 viewsOvercoming the obstacles of building a lean Linux-based MP3 player.
As part of the fourth year Computer Engineering degree course at Nanyang Technological University (NTU), Singapore, we have developed an audio player based on the JUMPtec DIMM-PC. The system runs Linux and occupies only 5MB of total memory space, leaving us with 11MB of memory available to run other applications. Presently, we are trying to improve our audio algorithm to fulfill the run-time requirement of the player. We have developed a working player based on the CCITT G722 coding format, which does not require too much computational power, and have an MP3 player nearing completion. The purpose of this article is to show how we used Linux in this embedded system, and how we solved a number of the issues involved in getting the system up and running.
About the System
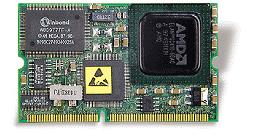
Figure 1. The DIMM-PC/486-I
JUMPtec has developed an i486-based system the size of a match box, as reported previously in Linux Journal. The DIMM-PC/486-I comprises a highly integrated AMD processor that contains the complete functionality of an 80486 SX motherboard with 66MHz CPU, BIOS, keyboard controller and real-time clock (see Figure 2). The PCB also has a 16MB IDE-compatible flash-hard disk (i.e., solid state) and 16MB of DRAM onboard. A connector allows peripheral functions like COM1, COM2, LPT1, floppy interface and IDE hard disk to be interfaced. Detailed information is availale at the JUMPtec web site, www.jumptec.com.
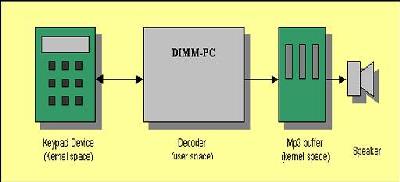
Figure 2. System Design
Using the DIMM-PC as the platform for an embedded system, we are required to develop only specialized peripherals for the system; software development can be carried out on a standard PC running, of course, Linux. In our case, we developed only a user interface (comprised of a keypad and LCD display), and an audio output buffer. Even though the DIMM-PC has built-in BIOS support for alphanumeric LCD display, we decided to develop our own so that the system could be easily ported to any hardware platform (including a desktop PC for development purposes). We also built a FIFO buffer for audio output to free up more processing time for the system. The FIFO buffer is currently connected to a DAC, which converts raw PCM data to an analogue music signal.
Installing Linux on the DIMM-PC
The installation of the DIMM-PC with Linux was made easy with the help of the EMJ-Linux image which EMJ America has complied and made available. This small distribution of Linux fits on a 1.44MB boot disk. This boot disk contains everything needed to do a network install of embedded Linux using a 5.7MB compressed file (16MB uncompressed) downloaded directly to the DIMM-PC's 16MB flash drive (or to an IDE drive). Once loaded, the DIMM-PC with Linux will support IDE devices (hard drives and CD-ROM), Ethernet, TCP/IP, telnet, FTP, and WWW (Apache 1.3.9). This distribution, based roughly on Slackware v4.0 and compiled by Scott Every, will install completely from a single floppy as long as the DIMM-PC is connected to the Internet (via Ethernet). As our system does not include an Ethernet connection, this method of installation could not be used. However, the full image file for the flash hard disk can be downloaded from their FTP site. Subsequently, using manual installation as shown in the following instructions, we managed to install Linux on the DIMM-PC off-line. To manually install the DIMM-PC:
- Obtain the boot disk file from the EMJ site and transfer the file to a floppy disk using Rawrite (for Windows/DOS) or dd if=emj-linux.img of=/dev/fd0 (where emj-linux.img is the downloaded boot disk file) for UNIX/Linux.
- Download the flash image (flash-img.gz) from the EMJ FTP site (see Resources). Then unzip the file using gunzip flash-img.gz. This will create a file called flash.img.
- Boot the DIMM-PC using the boot floppy created in step 1.
- After the DIMM-PC has booted, initialise the flash hard disk with fdisk /dev/hda. Create a primary partition 1 with maximum size and then make it bootable.
- Write the image file (flash.img) to the hard disk (hda) using the command dd if=flash.img of=/dev/hda1.
- Mount this hard disk by typing: mount -t ext2 /dev/hda1 /mnt.
- Use LILO to configure the root file using the command <>/mnt/sbin/lilo r /mnt -C /etc/lilo.conf, where -r indicates root file location redirection (see the LILO man pages).
- Reboot the system.
Once the DIMM-PC is installed with EMJ-Linux, removing the Ethernet support will optimize the kernel. This is done by creating another boot disk and loading this new kernel into the DIMM-PC using LILO. Their drivers can also be loaded into the kernel. In our case, these drivers include the keypad driver and the LCD driver support.
One problem with the EMJ-Linux distribution is the lack of included development tools (probably due to size constraints). Compiling and debugging facilities are not built in to the DIMM-PC, so development must be performed on a host PC, cross-compiled and downloaded to the targeted DIMM-PC. Thus a complete Linux PC is required. We had installed Mandrake Linux 6.1 on the PC with kernel version 2.2.19mdk. We then faced another problem–the kernel version of the DIMM-PC and the host PC do not match. To resolve this incompatibility, we downloaded the DIMM-PC kernel version 2.2.12, and recompiled our application using this kernel. As our application does not have a VGA card, a text terminal is required for debugging purpose. To allow the DIMM-PC to interface with an external text terminal via serial port, the following few lines are added to /etc/inittab:
 #serial
 s1:12345:respawn:/sbin/agetty 19200 ttys0 vt100
This will cause init to spawn a login process on COM port 1 (ttyS0), with a baud rate of 19200. Though the process of booting is not shown on the text terminal, it could be viewed in retrospect with the command dmesg. JUMPtec provides remote control software to configure the BIOS via serial connection, although in our system it would not work. (We believe it doesn't like either Linux or the lack of a VGA card.) It is also possible for LILO to talk via serial terminal during the boot process.
One point to note is that when we inadvertently grounded the interrupt pin for COM1 (INTR 4), the boot process is excruciatingly slow, even when we set the baud rate to 19200bps. This is due to the serial interrupts being inhibited. One more change is necessary to allow the superuser to log in though the serial port: the following lines must be added to /etc/securetty:
 tty0
 tty1
  :
 ttyS0
We can use normal communication software like kermit or minicom on our host PC to communicate with the DIMM-PC. The setting of the interface is 19200bps, 8 bits, no parity, 1 stop bit, hardware flow control (although software flow control is also supported). File transfers can be made this way using programs such as rz (to receive files sent using ZMODEM) and sz (to send ZMODEM files).
System Design
We added two peripheral devices to the system: the keypad device and the MP3 buffer, both operating in kernel space (see Figure 3). The keypad device allows the user application to get input from the keypad and allows the application to send information to be displayed on the LCD. The MP3 Buffer is a FIFO buffer that allows the application to clock in data to the buffer though the parallel port while an external timer transfers the data to the speaker though the DAC. Buffer arbitration is included in the hardware.
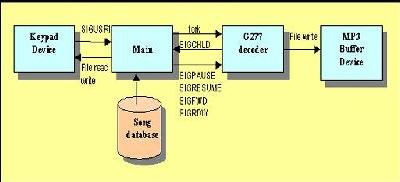
Figure 3. The Program
The Keypad Device
The keypad device consists of a two-line alphanumeric LCD and a 4-by-4 keypad. Our keypad uses interrupts to notify the user program of a keypress. When an application opens the keypad device, the PID of the application is registered in our driver, which allows us to send signals to the correct application. To use the device we have to first load the driver module with insmod keypad.o to register the device with the kernel. The following listing from insmod.c shows how we register the device with the MAJOR number KEYPAD_MAJOR_DEV in the kernel symbol table. To ensure that other devices do not occupy the memory space of our device we use check_region then request_region to respectively interrogate and claim the memory space we require (see Listing 1).
Listing 1. Registering the Keypad Device with the Kernel
 int init_module(void)
 {
         int err;
         /* Register as a device with kernel. */
         if ((err = register_chrdev(KEYPAD_MAJOR_DEV, "keypad", keypad_fops))){
                 printk("keypad: Failure to load module. error %dn", -err);
                 return err;
         }
         /*Register the region of iospace with kernel and get base address */
         if ( check_region(KEYPAD_BASE, 1 ) != 0 ) {  /* in use */
                 printk("keypad: Can't allocate region port address %#xn",
 KEYPAD_BASE );
                 return -ENODEV;
         } else
         {request_region( KEYPAD_BASE, 1, "keypad" );}
         /* Register interrupt handler. */
         if (request_irq(KEYPAD_IRQ, keypad_ReadInterrupt, SA_INTERRUPT,"keypad",
 NULL)){
                 printk("keypad: Can't request IRQ %dn", KEYPAD_IRQ);
                 if (unregister_chrdev(KEYPAD_MAJOR_DEV, "keypad" ) != 0 )
                 {
                         printk( "keypad: unregister_chrdev() failed.n");
                 }
                 release_region(KEYPAD_BASE, 1 );
                 return -(EIO);
         }
         keypad_wait = NULL;
         printk("keypad: address=%#x IRQ=%d.n", KEYPAD_BASE, KEYPAD_IRQ );
 }
To see if our device has registered successfully, we can use the command lsmod, which shows a comprehensive summary of the total usage count and pages that each device uses. With our driver, request_irq was used to register use of an interrupt so that the interrupt routine keypad_ReadInterrupt will be run whenever that particular interrupt occurs. Within our interrupt service routine, we will send a SIGUSR1 signal to the user PID with the kill_proc function, and wake up any process in the keypad_wait queue. The user's PID was that recorded when a user application opens the device.
 static void keypad_ReadInterrupt(int irq)
 {
         kill_proc(pid,SIGUSR1,1);
         wake_up_interruptible(&keypad_wait);
 }
Next, to open the keypad device, the predefined macro MOD_INC_USE_COUNT defined in linux/module.h is invoked to increase the usage count. After these steps are complete, we are able to read and write to our device. If the device was opened in blocking mode, the process is put on the keypad_wait queue with interrupt_sleep_on.
 static int keypad_open(struct inode *iNode,
 struct file *filePtr)
 {
         pid=current->pid;
         MOD_INC_USE_COUNT;
         return 0;
 }
Data is copied to user space using put_user, which will copy an unsigned character to the user space. To write to the keypad, we do a copy_from_user which also allows us to specify the number of characters to copy. These are both shown below:
static int keypad_read(struct file * file, char *
buffer,size_t count, loff_t *ppos)
 {
  if(file->f_flags & O_NONBLOCK){
  interruptible_sleep_on(&keypad_wait);
 }
  put_user(inb(KEYPAD_BASE)&15,
  (unsigned char*)buffer);
  return 1;
 }
then,
 static int keypad_write(struct file * file, const char * buffer,size_t
 count,loff_t *ppos)
 {
  unsigned char *outValue=kmalloc(count, GFP_KERNEL);
  if (!outValue) return -ENOMEM;
  copy_from_user(outValue, buffer, count+1);
  if (outValue[0]=='1')
    pStatus(1, outValue+1); /*display characters on line 1*/
  else
    pStatus(2, outValue+1); /*display characters on line 2*/
  kfree(outValue);
  return 1;
 }
When the device is no longer needed, the application will close it and the usage count will be decremented by invoking the predefined macro, MOD_DEC_USE_COUNT.
 static int keypad_close(struct inode *iNode,
 struct file *filePtr)
 {
         MOD_DEC_USE_COUNT;
         return 0;
 }
To completely remove the device from the kernel symbol table, the user can use the command rmmod keypad. This will also release the memory space and free the interrupt. The corresponding module code to do this is shown below:
 void cleanup_module(void)
 {
  if (MOD_IN_USE) {
     printk("keypad: device busy, remove delayedn");
     return;
  }
  release_region( KEYPAD_BASE, 1);
  free_irq(KEYPAD_IRQ, NULL);
  if (unregister_chrdev(KEYPAD_MAJOR_DEV, "keypad") != 0) {
     printk("keypad: cleanup_module failedn");
  } else {
     printk("keypad: module removed.n");
  }
 }
One problem we faced while prototyping the keypad was use of a shared interrupt. The initial idea was to share the keypad interrupt with the serial port (UART) device that is onboard the DIMM-PC. It turned out that every time we pressed a key, the system reset. This is because when any key is pressed, the keypad causes the interrupt line to go low while the UART forces it high. This causes a power glitch, which resets our system every time we press a key! Even though the kernel supports shared interrupts, we had to be careful how we connect the lines from the DIMM-PC connector.
The MP3 Buffer Device
The initiation process for the keypad device is also done on the MP3 buffer device. This buffer uses two separate clocks to clock in and clock out data, and is designed to free the CPU from synchronisation tasks and rigorous timing requirements. The CPU clocks in data to the FIFO buffer while an external timer clocks it out. Because we are using an AM7200 CMOS FIFO chip, we do not have the synchronization problems associated with the above process as it is taken care of by the chip. The AM7200 is actually a 9-bit wide buffer, and we access it byte-wise. We are also considering ways to use two devices to allow 16-bit words to be clocked in a single cycle (although this involves a single 16-bit word transfer, which is not possible with the 8-bit parallel port which we currently use).
Even though building the FIFO buffer may sound like an easy task, the difficulty of reliably clocking data proved otherwise. At first we thought that problems were caused by the setup and hold time of the FIFO, so we relaxed our timing parameters. It turned out that even at a low frequency of 8kHz, we were not able to reliably clock data. After investigating the timing waveforms, we found that the rise time of the clock was to specification and we resolved this using a Schmitt trigger inverter. The current system can reliably clock data at rates up to 50kHz.
The Interface Algorithm
Making use of Linux's multi-tasking ability, our interface algorithm is based on process forking and signal handling. In fact, this allowed our programming to be better structured and more easily maintainable.
When the user process starts, it registers the SIGUSR1 signal handle. Whenever SIGUSR1 is received, we will read the keypad device and write the status information to it using normal file I/O commands like read and write. Even though the keypad device could directly send signals corresponding to the key pressed, we do not do so as this will involve decoding the keypad matrix. This will take up valuable kernel time and delay the operation of other kernel processes (see Figure 4).
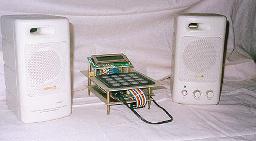
Figure 4. A Complete System
To play a song we fork out a playback process, which will signal SIGCHLD when the playback is completed. The main routine will also use signals SIGSTOP, SIGPAUSE, etc., to control the playback process. As we have forked out two separate processes, we are able to run these processes simultaneously.
 struct sigaction action;
 action.sa_handler = mainhd_usr;
 sigemptyset( &action.sa_mask );
 action.sa_flags = SA_NOCLDSTOP;
 if((sigaction( SIGUSR1, &action, NULL))<0)
         perror("error in registering SIGUSR1 signal handle");
 if((sigaction( SIGCHLD, &action, NULL))<0)
         perror("error in registering CHILD signal handle");
Our keypad device is opened with read/write ability and is non-blocking (so that we can read the keypad and return immediately to our function), as the following code example shows:
 if ((device_Keypad = open(KEYPAD_DEV, O_RDWR )) < 0) {
         printf("error opening device %sn", KEYPAD_DEV);
  exit(2);
 }
After we set up the device and signal handler, we wait for the signal using the pause function, which will wake up whenever any signal is sent to the process. When we use the signal-handling routine, we should avoid calling functions that are non-re-entrant. As our playback process uses static data (non re-entrant), the signal handling routine might change the local data each time we signal the process. This may cause difficulty in recovering the previous data. To rectify this, the signal handling routine changes only the command flag and the main function will check this flag at every signal arrival.
Profiling and Performance Tools
As we are making a real-time audio player, it is essential to locate any bottleneck in the system in order to satisfy runtime requirements. Due to the fact that the DIMM-PC has only 16MB of hard-disk space, setting up any profiling and development tools is probably not possible. Thus, secondary storage is required. We were faced with the difficulty of using another storage device as our root device. This is because the system always boots from the first drive (the on-board flash hard disk), which cannot be replaced. This problem is solved by creating another boot floppy that boots a second external IDE hard-disk as the root device. Again, EMJ America has provided a development boot floppy that fits the requirement. With their development boot disk, we have only to create a full Linux system with all the required development tools on any convenient Linux PC. This hard disk is connected to the slave primary IDE, and booted using the development boot floppy.
For real-time development purposes, we installed gprof on the secondary device. gprof is a profiling utility that will give us a very detailed listing of the running statistics for our program, including how often each function was called, from where, and the total amount of time that each function required. In order to use gprof, we must compile our source code using the -pg option for gcc. This adds profiling information to the object file and links the executable with standard libraries that have profiling information enabled. Having compiled the program to profile with -pg, we simply run the executable. If it exits normally, the file gmon.out will be written to the working directory of the program. This file contains profiling information for the run and can be used with gprof to display a table of statistics.
 Foo$ gcc -o main -static -O2 main.c -pg
 Foo$ ./main
 Foo$ ls -l gmon.out
 -rw-------  1 foo   foo   54448 jun 5 17:00 gmon.out
 foo$ gprof main gmon.out
The output of gprof for our MP3 code is shown in Table 1.
Flat profile: Each sample counts as 0.01 seconds
| % time | cumulative seconds | self seconds | calls | self ms/call | total ms/call | name |
| 40.04 | 6.19 | 6.19 | 24840 | 0.25 | 0.39 | synthesis |
| 22.96 | 9.74 | 3.55 | 24840 | 0.14 | 0.14 | big_dct |
| 6.99 | 10.82 | 1.08 | _mcount_inter | |||
| 5.37 | 11.65 | 0.83 | 12042 | 0.07 | 0.07 | mid_dct |
| 4.72 | 12.38 | 0.73 | 415716 | 0.00 | 0.00 | bitread |
| 4.66 | 13.10 | 0.72 | read | |||
| 3.30 | 13.61 | 0.51 | write | |||
| 2.91 | 14.06 | 0.45 | 690 | 0.65 | 1.51 | dequantizer |
If any of the fields are blank in the output, gprof was unable to determine any further information about that function. This is usually caused by not compiling parts of the code with -pg option. For example, if we call routines in non-standard libraries that have not been compiled with -pg, gprof will not be able to gather much information about these routines. The above sample shows that the read and write functions have not been compiled with profiling enabled. These functions are from the standard libraries, which are distributed with the Linux system without the profiling option enabled. The second part of the gprof report (shown in Table 2) gives us a detailed “call graph'' describing which functions called other functions, and how many times.
| index | % time | self | children | called | name |
| 0.07 | 12.33 | 1/1 | _libc_start_main [2] | ||
| [1] | 88.8 | 0.07 | 12.33 | 1 | main [1] |
| 0.05 | 12.07 | 345/345 | layer3 [3] | ||
| 0.11 | 0.00 | 1/1 | initialise [13] | ||
| 0.08 | 0.00 | 47093/415716 | bitread [9] | ||
| 0.00 | 0.01 | 346/346 | read_frame [21] | ||
| 0.00 | 0.00 | 345/345 | write_buffer [25] | ||
| 0.00 | 0.00 | 1/1 | create_tables [27] | ||
| [2] | 88.8 | 0.00 | 12.40 | _libc_start_main [2] |
The first column of the call graph is the index–a unique number given to every function, allowing us to find other functions in the graph. Here “main'' requires 88.8% of the total running time (12.33sec) including its children, but requires 0.07 seconds to run itself. The call graph normally displays the children as well as the parents of each function in the graph. Here, we see that main called layer3(), initialise(), bitread(), read_frame(), write_buffer() and create_tables(). However, if there is no parent, “
Conclusion
Using regular Linux tools, we have developed a real-time player that is able to play G722-coded audio. We are working towards a real-time MP3 player, although the major difficulty is that the DIMM-PC does not have floating-point capabilities.
To this end we have written our own fixed-point MP3 player (for both the 486SX hardware and for a separate ARM-based system), and we are squeezing it down so that it will work on the 66MHz AMD processor. Of course, with a slightly more computationally powerful processor, the difficulty of playing real-time MP3 would be removed, and, in fact, JUMPtec is said to be working on a Pentium version.
In this article, we have described the development of an embedded Linux audio system with components working in both kernel and user space. Linux has provided us with lots of programming help, as source codes are distributed freely, and development tools are of a very high standard. Furthermore there are discussion groups where information can be found, and we must acknowledge the substantial help given to us during our development by other Linux developers worldwide. In our project, Linux has proven to work extremely well during both development and runtime, and we therefore wish to thank the Linux community for a top-quality OS.
About the authors:
Ian McLoughlin ([email protected]) has been computer literate for 15 years and a Linux user for five years. He develops and runs Linux on numerous embedded and desktop systems using StrongARM, PowerPC, UltraSPARC and x86 processors. He is currently developing flight hardware and software to control the first Singaporean-made satellite (and is trying hard to push for real-time Linux on StrongARM when it launches in 2003), as well as working on many other totally unrelated but interesting Linux projects. His day job is lecturing.
Foo Mengshin was born in Singapore in 1975 and is building this MP3 Player as his undergraduate final year project. He took up this task due to a great interest in embedded systems. Finally being able to set up a working system really gave him great satisfaction, especially just starting with Linux a year ago. However, during the course of the project, some “smoke and stuff like that” happened. When this occurred, having all his hard work literally going up in smoke, caused him a lot of pain. But this is the course of life, right?
Copyright © 2001 Specialized Systems Consultants, Inc. All rights reserved. Embedded Linux Journal Online is a cooperative project of Embedded Linux Journal and LinuxDevices.com.
This article was originally published on LinuxDevices.com and has been donated to the open source community by QuinStreet Inc. Please visit LinuxToday.com for up-to-date news and articles about Linux and open source.