Hands on with LabVIEW and Embedded Linux (Part 6)
Oct 14, 1997 — by Rick Lehrbaum — from the LinuxDevices Archive — 17 viewsDeploying on the hardware
The embedded system we just built on virtual hardware was a lot like using real hardware. We still had to partition and format our storage device. The process of installing the operating system and the bootloader was the same. Now it's time to expand on what we learned and use Linux to build an embedded system using real hardware. Unlike virtual hardware that you can try out for free, real hardware you have to buy. We're going to show you how to use Linux, LabVIEW, and PC/104 hardware to build your own embedded devices.
There are an incredible number of compact, low-power computer platforms on the market. Regardless of the software you wish to run, there is a computer and I/O hardware that will accommodate your choice. Only rarely will you have to build something custom.
For our development system we're using the MOPSlcd6 PC/104 board from JUMPtec. PC/104 is a popular form of single-board computer that applies to many situations where you want to use LabVIEW in an embedded system. With PC/104, the standard PC and ISA bus has been reduced to a single board measuring 90 x 95 mm (3.5 x 3.75 in.) or roughly the size of a floppy disk. The PC XT and AT bus has been repackaged into a pin and socket connector. One of PC/104's best features is that each module stacks onto the module beneath giving a sturdy and reliable bus without a backplane. A typical system will consist of a PC/104 motherboard with expansion modules stacked on top.
PC/104-Plus is a higher speed, 32-bit implementation of the PCI bus designed for the PC/104 form factor. There are a lot of data acquisition cards, framegrabbers and other I/O modules for PC/104-Plus. Because of the wide array of available processors, systems, and I/O boards, we chose a PC/104-Plus board from JUMPtec Adastra for our example system.
The MOPSlcd6 from JUMPtec is the only PC/104 board with Pentium power, VGA graphics and 10/100 Ethernet on a single board. It has everything we need for a small embedded LabVIEW system. The MOPSlcd6 comes with either a 266 MHz or a 166 MHz. Pentium MMX. We're using the 166 MHz version which is fast enough for most embedded LabVIEW tasks. The graphics are supplied by an onboard Chips and Technologies 69000 LCD-VGA controller with 2 MB video RAM. With this chip we can drive an LCD display and/or a VGA monitor at 1024 x 768 resolution with 64k colors (1280 X 1024 with 256 colors) so our LabVIEW graphics look crisp and beautiful. It runs on a single 5 V, 1.8 A supply, through you may need ±12 V for some external I/O boards.
Whenever you build any computer system from scratch, it seems that most of your time is spent trying to gather together all the different cables and connectors that each peripheral requires. JUMPtec already thought of that for us and included everything needed to build a PC/104 development system in the MOPSlcd6 QuicKit. The QuicKit comes in one box that has the MOPSlcd6, 64 MB RAM and a PC/104 starter kit. The starter kit includes a power supply and a breakout board to connect the PC/104 bus with three ISA expansion slots. But most importantly the QuicKit has all the miscellaneous cables and connectors you need to connect to external peripherals.
The QuicKit's 64 MB of RAM may seem marginal compared to the hundreds of megabytes on most desktop machines today but to our stripped down Linux system 64 MB seems HUGE! You will have lots of room for the OS, X Windows and your application. The memory footprint of the embedded Linux system included on the CD with Linux, X Windows, and our small LabVIEW executable is less than 30 MB. Keep in mind the fact that you don't store the entire LabVIEW development package on your embedded system.
In addition to the QuicKit, we added a 32 MB chipDISK (IDE flash storage) that we'll use as permanent storage for our embedded LabVIEW system. Do you remember when an entire operating system used to fit on a single floppy? You can still fit an entire Linux system on a floppy but unfortunately there isn't enough room on there for X Windows and your embedded LabVIEW application as well. The embedded system that comes on this book's CD-ROM takes 25 MB of space. It includes all the runtime libraries needed for LabVIEW 6 so you should have plenty of room for your executable. If you are using LabVIEW 5, you can reclaim almost 8 MB of the flash storage by eliminating the run-time engine and libraries needed by LabVIEW 6. Or, if you think you need more room, you can get chipDISKs ranging in size all the way up to 96 MB.
The type of IDE connector used on most small form factor boards including JUMPtec's is the same 44-pin connector found on 2.5-inch hard drives used in laptops. This connector integrates the drive's power into the data cable. The chipDISK mounts directly into this connector. That's what makes using the chipDISK so nice; no cables, no adaptors, just plug it into the IDE connector and go. Also, there's nothing to stop you from using a hard drive in that slot if you need lots of storage capacity on-board.
A MOPSlcd6 QuicKit with a 32 MB chipDISK has everything we need to run your embedded LabVIEW system, but you still need to install your embedded system from the CD-ROM onto the chipDISK. The Adaptec IDE controller chip on the MOPSlcd6 can support two IDE devices, a master and a slave device. Adastra Systems can provide you with an adapter (part number 96004-0000-00-0, $15.00) that will let you use both a CD-ROM and the chipDISK from the onboard IDE controller, but for maximum flexibility during the development phase we decided to add a secondary IDE drive controller in one of the starter kit's ISA slots.
Using a secondary drive controller gives you an easy way to connect a CD-ROM and it allows you to connect an extra hard drive. After you've installed the embedded Linux system from the CD-ROM onto the chipDISK and tested the system out, you can put a full development system of Linux and LabVIEW for Linux on your hard drive to develop your own custom embedded applications. For completeness we also added an external floppy drive.
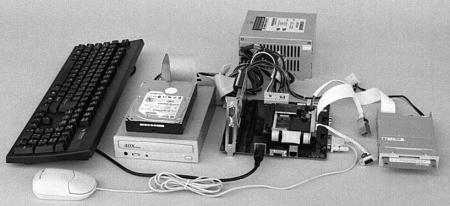
Figure 3: here's our completely assembled development system.
Here's a list of all the components we used in putting our system together . . .
- From JUMPtec . . .
- MOPSlcd6 QuicKit (part no. 870-022). The QuicKit includes a MOPSlcd6 with 166 MHz PentiumMMX, 10/100 Ethernet and PC/104-Plus (part no. 01023-0000-16-3), 64MB SO-DIMM 144 pin Memory Stick (part no. 97005-6400-00-0) and a PC/104 Starter Kit (part no. 850-018). Total price for the QuicKit is about $812.
- chipDISK/32-IDE (part no. 08001-0032-00-0), a 32 MB flash memory.
- MOPSlcd6 QuicKit (part no. 870-022). The QuicKit includes a MOPSlcd6 with 166 MHz PentiumMMX, 10/100 Ethernet and PC/104-Plus (part no. 01023-0000-16-3), 64MB SO-DIMM 144 pin Memory Stick (part no. 97005-6400-00-0) and a PC/104 Starter Kit (part no. 850-018). Total price for the QuicKit is about $812.
- Miscellaneous components, available at any computer store . . .
- Secondary IDE drive controller for ISA bus
- IDE CD-ROM drive
- IDE hard drive (20 GB was the smallest we could find!)
- Floppy drive
- AT-style keyboard
- Serial mouse
- Secondary IDE drive controller for ISA bus
When fully assembled, the MOPSlcd6 kit looks like a technological work of art. It's hard to believe that something this small could have so much functionality. Once the RAM goes into its slot and the chipDISK is inserted into the IDE header, the total board height has not increased a bit. The entire package measures only 95 mm long by 90 mm wide and less than 25 mm high.
Connecting the cables from the MOPSlcd6 to the breakout board is simple. After connecting all the cables and inserting the board into the PC/104 connector you'll need to connect the keyboard, plug the mouse into COM1, and install the secondary drive controller in one of the ISA slots.
On the secondary drive controller, connect the CD-ROM drive as the master and the optional hard drive as the slave device. Under Linux, the chipDISK will show up as /dev/hda, the CD-ROM as /dev/hdc, and the extra drive as /dev/hdd.
Boot the PC and edit the boot sequence in the BIOS so the system boots off the CD-ROM before the hard drive. (At start-up, hit F2 to enter the BIOS configuration screen.) Save the changes to the BIOS, insert this book's CD-ROM, and reboot. The system should now boot off the CD-ROM. Hit enter at the prompt and you will be taken directly to a Linux console.
Story navigation . . .
- Part 1: Introduction
- Part 2: What is LabVIEW?
- Part 3: Why use a desktop OS to build an embedded system?
- Part 4: Getting to know VMware
- Part 5: Six steps to Building an Embedded Linux System
- Part 6: Deploying on the hardware
- Part 7: Conclusion
This article was originally published on LinuxDevices.com and has been donated to the open source community by QuinStreet Inc. Please visit LinuxToday.com for up-to-date news and articles about Linux and open source.