A technical introduction to MiniGUI
Oct 27, 2005 — by LinuxDevices Staff — from the LinuxDevices Archive — 75 viewsForeword — This article describes the features and capabilities of MiniGUI, a lightweight graphics framework for embedded systems based on uClinux, Linux, eCos, or proprietary real-time OSes. The article is written by Wei Yongming, who wrote MiniGUI for a CNC (computer numerical control) system, then released it to open source seven years ago. Enjoy . . . !
MiniGUI, developed by Feynman Software, is one of the world-famous free software projects. MiniGUI aims to provide a lightweight graphics user interface (GUI) support system for real-time embedded systems. Since the first release under the GPL license at the beginning of 1999, MiniGUI has been widely used in handheld terminals (mobile phones and PDAs), set-top-boxes, industry control systems, industry instruments, portable media players, and so on.
Building MiniGUI for Embedded Linux Systems
The use of Linux in embedded systems is overwhelming today. Many traditional industry giants and new embedded devices vendors base their embedded software solutions on Linux.
Most embedded Linux development involves three aspects: the embedded OS system (bootloader, Linux kernel, etc.), the graphical user interface (GUI), and the applications. Qt/Embedded and MicroWindows are popular in the embedded Linux GUI world. In this article, we introduce MiniGUI, a desirable alternative to those two graphics libraries, and describe the basic concepts about how to use MiniGUI in an embedded Linux system.
What is MiniGUI?
MiniGUI is “a cross-operating-system graphics user interface support system for embedded devices,” and is “an embedded graphics middleware.” It aims to provide a compact, fast, stable, lightweight, and cross-OS GUI support system, which is especially fit for real-time embedded systems based-on Linux/uClinux, eCos, uC/OS-II, and other traditional RTOSes, such as VxWorks, ThreadX, and Nucleus.
At this point, MiniGUI has become a cross-platform GUI system; it can run on Linux/uClinux, eCos, VxWorks, pSOS, ThreadX, Nucleus, and even uC/OS-II, as well as on the Win32 platform; The hardware platforms tested include Intel x86, ARM (ARM7/ARM9/StrongARM/XScale), PowerPC, MIPS, and M68k (DragonBall/ColdFire). The newly released MiniGUI V2.0 provides full multi-process support for high-end embedded devices based on embedded Linux, which brings MiniGUI into the high-end embedded market.
MiniGUI is a complete GUI system tailored to embedded systems, with the following key technical features:
- First, MiniGUI is a complete embedded graphics support system designed and optimized for embedded systems. As a middleware between the OS and applications, MiniGUI hides the diversities of different underlying OSes and hardware platforms, and provides identical APIs for top-level applications.
- Support for many different real-time embedded operating systems, including Linux, uClinux, eCos, uC/OS-II, VxWorks, pSOS, ThreadX and Nucleus. SDK on Win32 platform is available also; it can facilitate the development and debugging of embedded applications.
- Support for three runtime modes. You can configure and compile MiniGUI to support one of three runtime modes: MiniGUI-Threads, MiniGUI-Processes, and MiniGUI-Standalone.
- Support for built-in resources. You can compile resources (bitmaps, icons, and fonts) directly into the library, so that there is no need to read these resources from files. Thus, MiniGUI can be used on some embedded systems without file systems.
- Mature multi-window and messaging mechanism.
- Commonly used controls, including static label, button, single-line, and multi-line edit boxes, list box, combo box, progress bar, property sheet, toolbar, track bar, tree view, list view, month calendar, grid view, animation, and so on.
- Support for dialog box and message box.
- Support for other GUI elements, including menu, acceleration key, caret, timer, etc.
- Support for skin UI. You can use skin APIs to build your dashy user interfaces.
- Support for enhanced graphics APIs for high-end video devices. You can use these APIs to do raster operations, create complex regions, draw or fill ellipses, arcs, and polygons, etc. There are advanced 2D graphics functions available in a system that provides a C99-compliant math library. We can even implement these advanced graphics interfaces on low-end video devices by using a Shadow engine that runs under the graphics abstraction layer of MiniGUI.
- Support for Windows resource files such as Windows bitmap, icon, cursor, etc.
- Support for almost all popular image file types including GIF, JPEG, PNG, Win32 BMP, etc.
- Support for multiple character sets and multiple font types. At present, what are supported include such character sets as ISO8859-1 ~ ISO8859-15, GB2312, BIG5, EUCKR, SHIFT-JIS, bitmap fonts such as Qt Pre-rendered fonts, and vector fonts such as TrueType as well as Adobe Type1. MiniGUI also provides an auto zoom out function, an anti-alias function for TV, and other output functions.
- Support for multiple keyboard layouts, including American PC, French, German, Italian, Spanish, etc.
- Input method interfaces to support special embedded devices. Moreover, input methods for Simplified Chinese are built-in.
- Special support for embedded systems, including common I/O operations, byte-order related functions, touch screen calibration interface, and so on.
- Secondly, many technical innovations have been made in the course of nearly seven years of development. These technical innovations have enabled MiniGUI to become more suitable for real-time embedded systems and have improved MiniGUI's flexibility, making it suitable for us in both high-end and low-end embedded systems, including handheld devices, set-top-boxes, game terminals, and so on.
- Graphics and input abstract layers (GAL and IAL) that, placing no influence on the top-level API, greatly facilitate the porting and debugging of MiniGUI itself, as well as of applications. At present, MiniGUI has been proven to be capable of running smoothly on embedded systems based on i386, ARM (44B0, MX1, StrongARM, XScale), MIPS, PowerPC, DragonBall, ColdFire, etc. By using graphics and input abstraction layers, we also could implement some software engines; the “Random” IAL engine simulating the real input can be used to do auto-test of MiniGUI and its applications. As another example, we are able to support output devices in YUV color space, such as in a TV set, by using the “Shadow” GAL engine. This engine can also provide support for those graphics chipsets whose frame buffers cannot be accessed directly, provide support for the devices with a color depth less than 8-bpp, and implement the screen rotation.
- An optimized architecture to support multiple charsets and multiple fonts. It is very easy to add a new font type and/or new charset support in MiniGUI. Support for various charsets is achieved by creating specific logical fonts in different charsets and/or encodings such as GB2312, BIG5, EUCKR, Shift-JIS, UNICODE UTF-8, etc. In a single MiniGUI application, it is very easy to display characters in different languages. Compared to conventional multi-charset implementations, which are achieved by UNICODE, MiniGUI's implementation consumes fewer resources and has greater flexibility.
- Three runtime modes. Compared to general-purpose operating systems like Linux, traditional embedded operating systems have some special requirements. For example, uClinux, uC/OS-II, eCos, and VxWorks usually run on non-MMU CPUs, without support for processes that have separate address spaces, but only threads or tasks. Therefore, the runtime environments are entirely different. Therefore, we can configure and compile MiniGUI into three runtime modes for different operating systems: MiniGUI-Threads, MiniGUI-Processes, and MiniGUI-Standalone.
- Finally, in MiniGUI V2.0.x, we not only provide, through MiniGUI-Processes, full support for Linux, which has a multi-process environment, but also keep the concept of a layer. By using a layer, we can create many workspaces for different processes, like X Window, whereas the footprint of MiniGUI-Processes is far less than X Window. MiniGUI-Processes can run very well on high-end embedded devices.
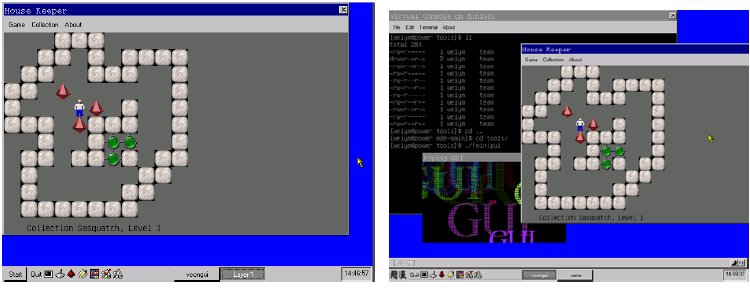
The left screenshot shows MiniGUI 1.6.8 running in single-process mode. Multiple running applications each have their own layer, and only one layer at a time is displayed. The screenshot on the right shows MiniGUI 2.0.1 running in multiple process mode
(Click to enlarge)
Porting MiniGUI to your Linux device
You will need to do a little extra coding work to port MiniGUI to your embedded device running Linux. Let's learn about MiniGUI's system architecture, first.
MiniGUI is a tiered GUI system, with a “Graphics Abstraction Layer” (GAL) and an “Input Abstraction Layer” (IAL) to deal with low level output and input. The concept of an abstraction layer is somewhat similar to the concept of a driver in an operating system. An abstraction layer defines a set of abstract interfaces independent of any particular hardware or low-level systems, and all the top-level graphics operations and input process are based on these interfaces. We can call the implementation code for the abstraction layer a graphics engine or an input engine. With the GAL and the IAL architecture, we can easily port MiniGUI to new devices or operating systems.
Most embedded Linux systems provide a frame buffer driver to the applications, for display output. If this is the case, you do not need to do any porting work on the graphics engine, because MiniGUI's fbcon graphics engine supports the Linux frame buffer already. If not, a bit of coding work is necessary, but you will not have to write an entirely new graphics engine from the start.
On a Linux device, there are no standard interfaces to process inputs from input devices such as touch screens and keypads. So, in most cases, you will need to write a new MiniGUI input engine (driver) for your input device. Writing an input driver for MiniGUI is fairly easy, because the input interface in MiniGUI is well defined. You can use the iPaq input driver (MiniGUI source directory/src/ial/ipaq.c) as a reference and model. Normally what you should do is this: open and initialize your input devices first, when MiniGUI is inquiring about input; acquire input data from input devices, if there is any; transfer it to MiniGUI input events; and, return to the system.
A “Hello world” example
Let's have a look at a “Hello world” example of a MiniGUI application.
/*
** helloworld.c: Sample program for MiniGUI Programming Guide
** The first MiniGUI Application
*/
#includestdio.h>
#include
#include
#include
#include
static int HelloWinProc(HWND hWnd, int message, WPARAM wParam, LPARAM lParam)
{
HDC hdc;
switch (message) {
case MSG_PAINT:
hdc = BeginPaint (hWnd);
TextOut (hdc, 100, 100, "Hello world!");
EndPaint (hWnd, hdc);
return 0;
case MSG_CLOSE:
DestroyMainWindow (hWnd);
PostQuitMessage (hWnd);
return 0;
}
return DefaultMainWinProc(hWnd, message, wParam, lParam);
}
int MiniGUIMain (int argc, const char* argv[])
{
MSG Msg;
HWND hMainWnd;
MAINWINCREATE CreateInfo;
#ifdef _LITE_VERSION
SetDesktopRect(0, 0, 800, 600);
#endif
CreateInfo.dwStyle = WS_VISIBLE | WS_BORDER | WS_CAPTION;
CreateInfo.dwExStyle = WS_EX_NONE;
CreateInfo.spCaption = "HelloWorld";
CreateInfo.hMenu = 0;
CreateInfo.hCursor = GetSystemCursor(0);
CreateInfo.hIcon = 0;
CreateInfo.MainWindowProc = HelloWinProc;
CreateInfo.lx = 0;
CreateInfo.ty = 0;
CreateInfo.rx = 320;
CreateInfo.by = 240;
CreateInfo.iBkColor = COLOR_lightwhite;
CreateInfo.dwAddData = 0;
CreateInfo.hHosting = HWND_DESKTOP;
hMainWnd = CreateMainWindow (&CreateInfo);
if (hMainWnd == HWND_INVALID)
return -1;
ShowWindow(hMainWnd, SW_SHOWNORMAL);
while (GetMessage(&Msg, hMainWnd)) {
TranslateMessage(&Msg);
DispatchMessage(&Msg);
}
MainWindowThreadCleanup (hMainWnd);
return 0;
}
#ifndef _LITE_VERSION
#include minigui/dti.c>
#endif
Running this program will create a 320×240 size window on the screen, with the “HelloWorld” window caption and a “Hello world!” text drawed in the middle of this application window.
As you can see, MiniGUI is a typical message-driven GUI system. The “MiniGUIMain” function is the entry point of every MiniGUI application. This application creates a main window with the CreateMainWindow function first, shows this window, and then begins a message loop using while (GetMessage (&Msg, hMainWnd)) statements.
MiniGUI consists of two versions, MiniGUI-Threads and MiniGUI-Lite, depending on the system architecture. MiniGUI-Threads, which is the initial MiniGUI version, is based on the POSIX thread mechanism. MiniGUI-Threads applications run within the same address space, significantly improving the inter-program communications efficiency. This kind of system architecture is well suited for time-critical systems such as real-time control systems.
Runtime modes of MiniGUI
Compared to general-purpose operating systems like Linux, traditional embedded operating systems have special requirements. For example, uClinux, uC/OS-II, eCos, and VxWorks usually run on non-MMU CPUs, without support for processes that have separate address spaces but only threads or tasks. Therefore, the runtime environments are entirely different. Therefore, we can configure and compile MiniGUI into three runtime modes for different operating systems:
- MiniGUI-Threads — A program running on MiniGUI-Threads can create multiple cascaded windows in different threads, and all the windows belong to a single process. MiniGUI-Threads is fit for some real-time systems on Linux/uClinux, eCos, uC/OS-II, and VxWorks.
- MiniGUI-Processes — In contrast to MiniGUI-Threads, a program running on MiniGUI-Processes is an independent process, which can also create multiple windows. The MiniGUI-Processes runtime mode is useful on full-featured UNIX-like operating systems, such as Linux and VxWorks 6.
Before MiniGUI V2.0, this runtime mode was called “MiniGUI-Lite.” MiniGUI-Lite provides a tradeoff for Linux systems in multi-process environments, but does not solve the overlap of windows that are from different processes. The MiniGUI-Processes runtime mode of MiniGUI V2.0 provides a full-featured windowing solution for multi-processes environment.
- MiniGUI-Standalone — This is the single process/thread/task runtime mode of MiniGUI. This mode is useful for some systems that lack PThread support, such as some buggy uClinux systems.
MiniGUI can run on almost all operating systems under MiniGUI-Standalone mode, theoretically. The MiniGUI-Threads mode is suitable for real-time operating systems that provide multi-tasking support, or for general-purpose operating systems like Linux/UNIX. Moreover, MiniGUI can run on UNIX-like operating systems like Linux and VxWorks 6 under MiniGUI-Processes mode.
No matter which mode is used, MiniGUI provides a high degree of application compatibility; only a few initialization interfaces are different for different runtime modes.
Running MiniGUI
Now, you may want to have a try with MiniGUI on your device. Please download the latest free versions of MiniGUI from the following web page, here.
About the author — Wei Yongming is the original author of MiniGUI. He is living in Beijing, P.R.China. A complete list of MiniGUI contributors is available here.
This article was originally published on LinuxDevices.com and has been donated to the open source community by QuinStreet Inc. Please visit LinuxToday.com for up-to-date news and articles about Linux and open source.