Article: Build DeJaneiro — a Browser-controlled MP3 Player
Nov 29, 2000 — by Rick Lehrbaum — from the LinuxDevices Archive — viewsForeword: This “mini how-to” by Kevin Dankwardt, of K Computing, explains how to create a home-made MP3 player appliance based on Embedded Linux. Its embedded software (kernel, utilities, and application) image is small enough to fit on a floppy, so you could easily install it in a DiskOnChip Flash device ( target=”_blank”>article) within a compact, appliance-like system (article). You control the resulting MP3 player using a web browser on a separate computer.
This project is used as an instructional exercise in K Computing's Embedded Linux training seminars. Although the procedures provided are minimal, it was felt that members of the Embedded Linux community would appreciate the challenge of working from a minimum of guidance. If you have any comments or questions, please feel free to contact K Computing at [email protected]. Enjoy!
DeJaneiro — a web-controlled MP3 player appliance
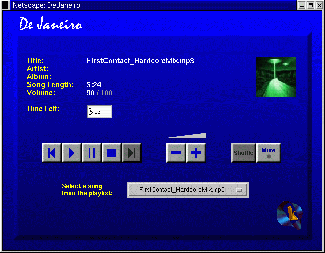
DeJaneiro Control Page
In the above image we show the control page for DeJaneiro. In this diagram, we show the envisioned scenario. The idea is that DeJaneiro is a piece of stereo equipment. But, instead of having knobs and such, DeJaneiro is controlled via a web browser running on your home computer, or perhaps, a remote or handheld device. In this project, we use a PC to simulate the stereo equipment pictured in the diagram.
Hardware/software required
You will require . . .
- x86 PC, both for development and to serve as the target hardware for DeJaneiro
- Sound card
- Network card — assuming you want to control the MP3 player from another computer
- Linux kernel — we use 2.2.14; get it here
- GoAhead webserver — get it here
- Xaudio — MP3 playing software; get it here
- Embedded website — web pages, directory setup, and cgi scripts for DeJaneiro interface; get them here
- Linux libraries — you know . . .
- BusyBox — small footprint utility package; get it here
- Ash — available with most Linux distributions.
- Formatted floppy image with SysLinux boot loader
Ready, set, . . .
There are a number of different ways to put together this project. We've chosen to use an approach that is both illustrative of many of the issues involved in developing an Embedded Linux system, and is relatively straightforward to accomplish.
Below are step-by-step instructions. We've attempted to include just enough instructions so that you can figure out what we mean. On the other hand, we've omitted some of the details intentionally, in order that you'll have the opportunity to work some of it out on your own. Good luck!
- Download the GoAhead webserver, xaudio, busybox, ash, the SysLinux floppy image, and the DeJaneiro web pages.
- Copy the SysLinux floppy image to a floppy disk doing something like “dd if=/dev/fd0 of=/empty_dos_image bs=1440k count=1”
- Create a SysLinux configuration file, called syslinux.cfg and put it on the floppy. Its contents could be:
default linux
prompt 0
display boot.msg
F1 boot.msg
label linux
kernel vmlinuz
append initrd=initrd.img root=/dev/ram ramdisk_size=8192 - Create a file called “boot.msg” and put a simple ASCII message inside. You will see this when you boot with the floppy
- Create a work space directory on your development system. In this directory create subdirectories called etc, dev, bin, tmp, lib, web, and proc.
- In the etc directory put an empty group file, an empty passwd file, a hosts file with the line “127.0.0.1 localhost loopback dejaneiro”, an inittab file with the two lines “console::sysinit:/etc/rc.sysinit” and “console::respawn:/bin/sh”, a nsswitch.conf file with the line “hosts:files” and a rc.sysinit file with lines to insert your sound and network drivers (if needed), an ifconfig to configure your network, and “/bin/webs &” to start the web server. Make sure that the rc.sysinit file has the execute permission set.
- In the dev directory, create device files that you'll need. Use the same major and minor numbers as found on your development system. We suggest you create console, dsp, null, mixer, and tty. Use the mknod command.
- Make busybox and include cat, cp, date, false, grep, head, hostname, init, kill, ln, ls, lsmod, mkdir, mknod, mount, more, mv, ps, pwd, rm, sed, sort, tail, tar, tee, true, touch, uname, uniq, wc, yes, whoami, and any other commands you would like to have.
- In the bin directory put ash, busybox, cut, expr, ifconfig, insmod, webs (the GoAhead web server), and rxaudio. Make links to ash called “sh” and “bash”. Make the links to BusyBox for the commands you included.
- In the lib directory put the dynamic libraries that you will need. Use the “ldd” command on the executables in bin to find out the libraries to include. Add to the list libnss_files.so.2 which won't show up with “ldd”.
- Copy the DeJaneiro web files to the web directory. Add a small MP3 file to the MP3 directory.
- The tmp and proc directories are to be empty.
- Create an empty, 8MB file with “dd if=/dev/zero of=initrd.img bs=8M count=1”. After creating the file, make an ext2 file system on it using mkfs.
- Mount that file as a loop back file and copy your subdirectories to it using find and cpio. A command from the directory above these, like “find . -print0 | cpio -p0dm ../initrd_directory” should do it.
- Umount the file and then compress it: “gzip -9 initrd.img” should do it.
- Copy the compressed file “initrd.img.gz” to the floppy calling it “initrd.img”.
- Make a new kernel with “make menuconfig”. Make sure to include sound and networking support and drivers for your sound and network cards. Be careful to choose only those options you need. The resulting kernel should be somewhere around 375K. Make a kernel of type “zImage”.
- Copy the kernel “zImage” to the floppy calling it “vmlinuz”.
- Boot the floppy
- Connect to it from a web browser — use port 8081.
Author's bio: Kevin Dankwardt is founder and President of K Computing, a Silicon Valley training and consulting firm. He has spent most of the last 9 years designing, developing, and delivering technical training for such subjects as Unix system programming, Linux device drivers, real-time programming, and
parallel-programming for various organizations world-wide. He received his Ph.D. in Computer Science, in 1988. He may be contacted at [email protected].
This article was originally published on LinuxDevices.com and has been donated to the open source community by QuinStreet Inc. Please visit LinuxToday.com for up-to-date news and articles about Linux and open source.