Getting started with an embedded Linux system emulator
Dec 22, 2008 — by LinuxDevices Staff — from the LinuxDevices Archive — 361 views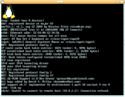 Foreword — This article describes setting up an embedded Linux cross-development environment targeting a virtual machine running on the development host. It covers installing Qemu and using it to debug applications and kernels, both with supplied test-images and with custom kernel/filesystem images… created with Buildroot.
The article was written by Gilad Ben-Yossef, co-founder of Israel-based embedded Linux training and consulting firm Codefidence. Ben-Yossef originally published the article on his Tuxology blog. Enjoy . . . !
by Gilad Ben-Yossef
One of the hallmarks of embedded system programming is working with specialized hardware. Unfortunately, embedded system developers do not always have the luxury to develop and test their code on the actual hardware they target. Often, the hardware is developed in tandem with the system software and therefore it it is not available for much of the embedded system software development cycle.
While one can develop and test much of our code on a PC running Linux, such a PC is a very different environment from the target board. More often then not, the target board is not even of the same architecture as the PC. A solution to this problem can be obtained by using an emulator – a software tool that executes software code of our target platform in a virtual machine that is running on our development host, and running our system software in it.
The following article describes how to build an embedded Linux system running inside an emulator which can be used to develop, test and debug target code even without access to target hardware.
The components
To build our emulator we will need the following components:
- Hardware emulator (we'll use Qemu)
- Minimal Linux root file system containing a C library and Busybox
- The Linux kernel
Installing Qemu
Created by Fabrice Ballard, Qemu is an open source machine emulator supporting seven target architectures, including x86, MIPS, ARM, and PowerPC. As first step, we will download and install the emulator. Depending on the Linux distribution you use on your workstation, you might be able to use the native package management system of the distribution to do so.
For Debian, Ubuntu and derivatives:
$ sudo apt-get install qemu |
For Fedora and derivatives (as root):
# yum install qemu |
For other distributions lacking a Qemu package, or for those wishing to obtain the very latest package (note that the “i386” label refers to the host running the emulator, and not the target platform):
$ wget http://bellard.org/qemu/qemu-0.9.1-i386.tar.gz |
Or, as root:
# tar zxvf qemu-0.9.1-i386.tar.gz |
Alternatively, you can download the sources and build the emulator from scratch. This has the added advantage that you can later adapt the emulator to more accurately reflect your actual hardware:
$ wget http://bellard.org/qemu/qemu-0.9.1.tar.gz |
Or, as root:
# make install |
Kernel and file system images
The Qemu emulator we have just installed provides a virtual machine mimicking our target hardware. To actually get Linux running on this virtual machine, however, we will need to download an image of the Linux kernel and a suitable root file system image for our target architecture.
Luckily, the Qemu project provides test images for several architectures that can be used to get a fast start with Qemu as an embedded Linux system emulator. Go to the Qemu project download page and choose one of the Qemu test disk images suitable for your embedded platform and download it to your Linux host (in this example we use ARM):
$ wget http://bellard.org/qemu/arm-test-0.2.tar.gz |
Now extract the image:
$ tar zxvf arm-test-0.2.tar.gz |
Booting Linux on the emulator
Start up Qemu with the following command line, adjusting the architecture name, kernel file name, and root file system image name according to your specific architecture (again, we use ARM in this example):
$ qemu-system-arm -kernel zImage.integrator |
The above command line starts Qemu in system emulation mode, booting into the kernel image zImage.integrator while loading into the virtual machine RAM the arm_root.img file system, and instructing Qemu to make your entire host root file system available for access via TFTP from the emulated machine (more on this ahead).
You should now be seeing a window similar to the following in which the emulated LCD display of the board is shown:
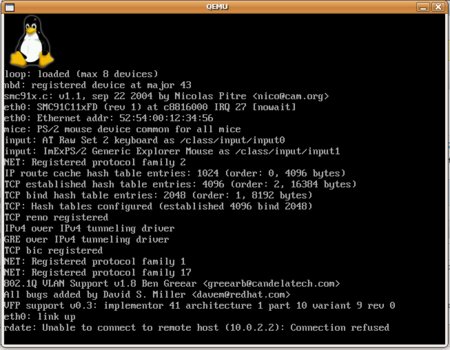
Qemu screenshot
(Click to enlarge)
You can log-in with the user “root” — no password is required.
Transferring files to and from the host
The emulator and file system are set up to automatically configure a virtual Ethernet interface in the virtual machine with an internal IP. Through that virtual network interface, the emulator is set up to enable transferring of files to and from the host machine file system using the TFTP protocol.
For example, the following command will copy the file “/home/gby/hello_emu” from the host file system to the current directory inside the emulator:
$ tftp -g -r /home/gby/hello_emu -l hello_emu 10.0.2.2 |
The following command will copy the file “/root/test.log” from the emulator to the host file system directory “/home/gby/”:
$ tftp -p -l/root/test.log -r /home/gby/test.log 10.0.2.2 |
In addition, you can use the “wget” comment to transfer files using the FTP and HTTP protocol to the emulator from any compatible server accessible in the network:
$ wget http://codefidence.com/some/file |
Qemu supports numerous other way to interact with the host and it's environment, including bridged virtual network interfaces (as opposed to the default NAT used in the example above). Bridged virtual network interfaces enable:
- Using NFS to communicate with the host
- Remote debugging from the host
- VLAN support
- Exposing the host file system as a FAT file system
- Mounting disk, flash, or CDROM images from the host file system
- Using USB devices connected to the host
For more information on these advanced options, please refer to the Qemu user manual.
Debugging user applications
Using the GNU debugger GDBserver agent, we can debug applications running inside the emulator using the GDB debugger on the host. To do this, first use one of the methods outlined above to copy the “gdbserver” executable to the emulator. Note that you will need a gdbserver executable that was built to run on the target architecture (such as ARM, in the example above), and not on that of the host!
Also note that since the test images do not contain debugging symbols for the system libraries, you will only be able to debug statically compiled applications using them. This limitation can be removed by building your own kernel and file system image (see below for more information on this topic).
$ tftp -g -r /home/gby/src/gdb/gdb/gdbserver/gdberver |
Next, assign the gdbserver binary execute permissions:
$ chmod u+x gdbserver |
Now, run the gdbserver agent, instructing it to use port 9999 (which we previously redirected to the emulator, when we launched qemu-system-arm from the command-line) to listen for connections from the debugger:
$ gdbserver 0.0.0.0:9999 /bin/myprog |
Or, if you wish to attach to an already running program, use:
$ gdbserver 0.0.0.0:9999 --attach 1234 |
Finally, run the GDB debugger on your host and instruct it to connect to the host local port 9999:
$ arm-linux-gdb target/bin/myprog |
Debugging the kernel
Using the Qemu emulator to debug kernel code is quite straight forward, as Qemu incorporates a minimal GDB agent as part of the emulator itself. To debug the Linux kernel running inside the emulator, add the “-s” parameter to the command line used to start Qemu:
$ qemu-system-arm -kernel zImage.integrator |
Now when the emulator starts, it will wait for a debugger connection on the default port “1234” (or a different port specific with the “-p” option), before proceeding with the boot. Once the emulator has started, you can debug the Linux kernel running inside it, using GDB on the host:
$ arm-linux-gdb linux/vmlinux |
You can use GDB as you normally would. For example, type “cont” to launch the kernel:
(gdb) cont |
Building your own kernel and file system images
So far we have seen how to use the Qemu emulator with the test kernel and file system images that are available on the Qemu site. To make full use of the emulator, we can create our own custom kernel and file system images that will better reflect the real target we are trying to develop for.
First, query Qemu regarding which boards it can emulate for your chosen architecture. Replace “arm” in the example above with one of: mips, x86_64, ppc, or sparc. For i386, simply use “qemu” as the command:
$ qemu-system-arm -M ? |
Choose the board that most closely resembles your real target environment. Note that you can add support to Qemu of your specific true board. This requires some programming though, and we shall not cover it in this tutorial.
The creation of a kernel and file system for our emulated target is no different then doing the same task for real hardware. In fact, many tools are freely available to accomplish this task. In this example, we shall use the Buildroot framework. Buildroot is a set of make files and patches that simplify the generation of a cross-compilation tool chain and root file system for your target Linux system, using the uClibc C library.
First, we shall download the latest Buildroot release from the project web site and extract it:
$ wget http://buildroot.uclibc.org/downloads/snapshots/buildroot-snapshot.tar.bz2 |
Next, let's configure Buildroot for our chosen target board:
$ make menuconfig |
You will be presented with a menu enabling you to pick your architecture, sub-architecture, specific board to build for. Other options include GCC and uClibc versions, and related details. For each menu choice in the configuration tool, you can find associated help information describing the purpose of the entry.
At minimum, the following configuration options needs to be set:
- Target Architecture option — choose your target architecture (e.g., arm.)
- Target Architecture Variant option — Chose a specific model of the architecture (e.g., arm926t).
- Target options menu — If the target board you wish to emulate (that is supported by Qemu) is listed, turn on support for that board (e.g., enable the “ARM Ltd. Device Support” menu, and inside it choose the “Integrator arm926” option).
- Toolchain menu — Turn on “Build gdb server for the Target” option, and if you would like to test C++ programs on the emulator, also the “C++ cross-compiler support” option.
- Target filesystem options menu — Enable the “cpio the root filesystem” option, and choose the “gzip” compression method. You may also request the file system image to be copied to a specified directory once it is generated.
- Kernel menu — Choose the “linux (Advanced configuration)” option, and pick one of the offered Linux kernel versions of the list offered. Also, select the “zImage” binary format. Here, you can also specify a directory to copy the generated kernel to.
In addition, you will need to supply a proper Linux kernel configuration file. Note that you can extract the kernel configuration file used to generate the kernel supplied as part of the test images, by issuing the following command from inside the emulator:
$ zcat /proc/config.gz > linux.config
Alternatively, Linux provides specific kernel configuration for optimal use with Qemu for some architectures. Run the following command to inspect the default kernel configuration included in a specific Linux kernel version:
$ make help
When you're done configuring Buildroot, exit the configuration utility (making sure to OK saving the changes) and type: “make”. Buildroot will now download all required sources, and build your new kernel and file system image for you. You should now be able to run the emulator using the kernel and file system image you have just created. Use the file name and path of the zImage binary as a parameter to Qemu's “-kernel” option, and the file name and path of the file system image with Qemu's “-initrd” parameter, like so:
$ qemu-system-arm -kernel zImage |
As we have shown, the Qemu emulator provides a fairly simple way to develop, debug, and test Linux kernels, drivers, and applications for a variety of embedded architectures, even when no actual hardware is available. More information about the software used in this article can be found on the qemu, gdb, and Buildroot websites.
 About the author — Gilad Ben-Yossef is the co-founder and CTO of Codefidence Ltd, and has been helping OEMs make and use free and open source software in commercial products and services since 1998. He is also the co-author of the book “Building Embedded Linux Systems,” 2nd Edition. In addition, he is co-founder of Hamakor, an NPO devoted to the promotion of FOSS in Israel, as well as a founding organizer of “August Penguin,” an Israeli community FOSS conference.
Gilad is a member of the Israeli chapter of Mensa, the Israeli Information Technology Association and the Israeli chapter of the Internet Society. He holds a B.A. in Computer Science from Tel-Aviv Jaffa Academic College. When not trying to make FOSS software do something the authors never intended, Gilad likes to SCUBA dive, read science fiction, and spend time with his wife Limor and his and two adorable girls, Almog and Yael.
This article was originally published on LinuxDevices.com and has been donated to the open source community by QuinStreet Inc. Please visit LinuxToday.com for up-to-date news and articles about Linux and open source.